NPC Quests
Create deep NPC-driven quests with branching stories and rewards. NPC Quests is an addon for NPC Dialog that adds a full quest system with prerequisites, item requirements, custom plugin checks, rewards, interaction tracking, and complex quest chains.
About NPC Quests
IMPORTANT: This is an addon plugin for the NPC Dialog plugin. NPC Dialog must be installed and working before installing NPC Quests.
Support Server - https://discord.gg/DRxwt8Qg2W
NPC Quests is an addon plugin for the NPC Dialog plugin. This addon extends NPC Dialog with comprehensive quest and requirement functionality. NPC Dialog must be installed first, as NPC Quests depends on it to function. This addon enables server administrators to create complex, interactive quest systems with NPCs without requiring any coding knowledge.
The addon works seamlessly with the main NPC Dialog plugin, automatically detecting when it is installed and enabling quest features throughout the dialog system. When the addon is installed, every button on every dialog page gains the ability to have requirements and rewards configured.
Key features include multiple types of requirements such as item requirements where players must have specific items in their inventory, NPC prerequisites where players must interact with other NPCs first, and custom requirements that integrate with other plugins through an API. The reward system is equally flexible, supporting item rewards, custom plugin rewards, and console command execution.
The plugin tracks all player interactions with NPCs, allowing for sequential quest progression. Players cannot access NPCs or buttons if they haven't completed required prerequisites. This enables the creation of branching storylines and complex quest chains where the order of NPC interactions matters.
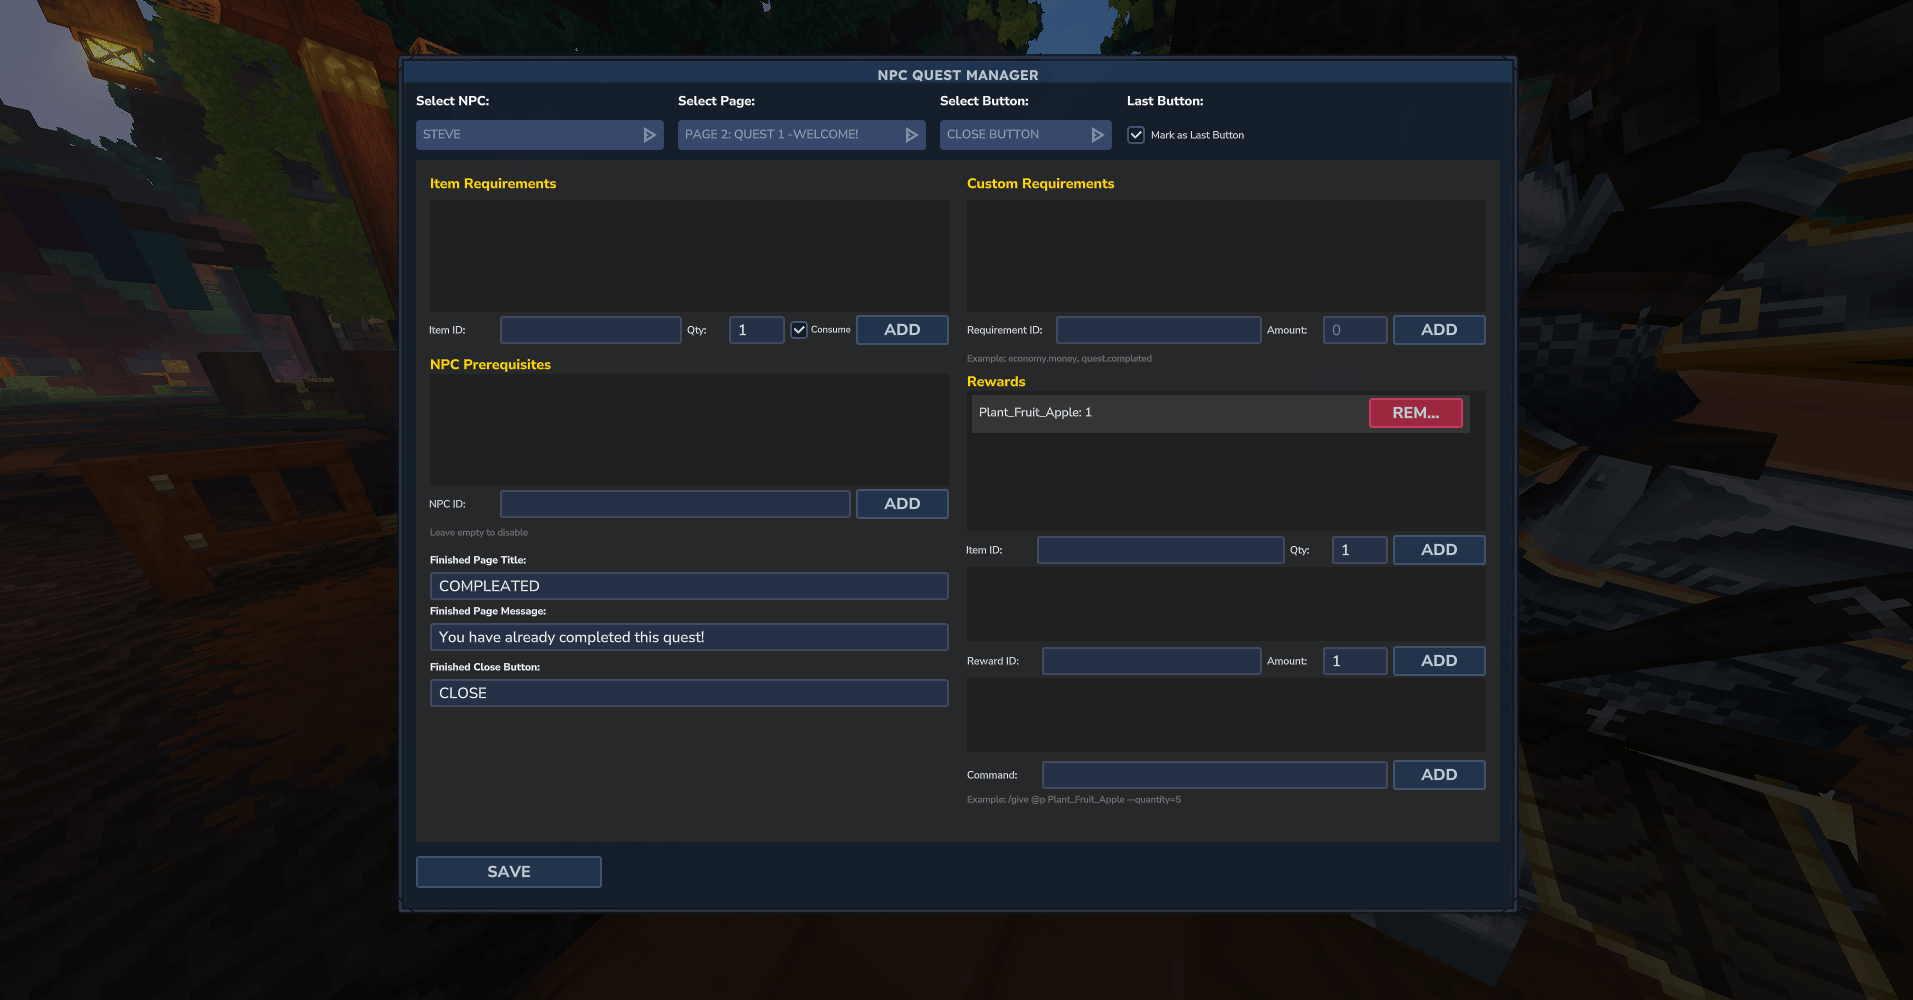
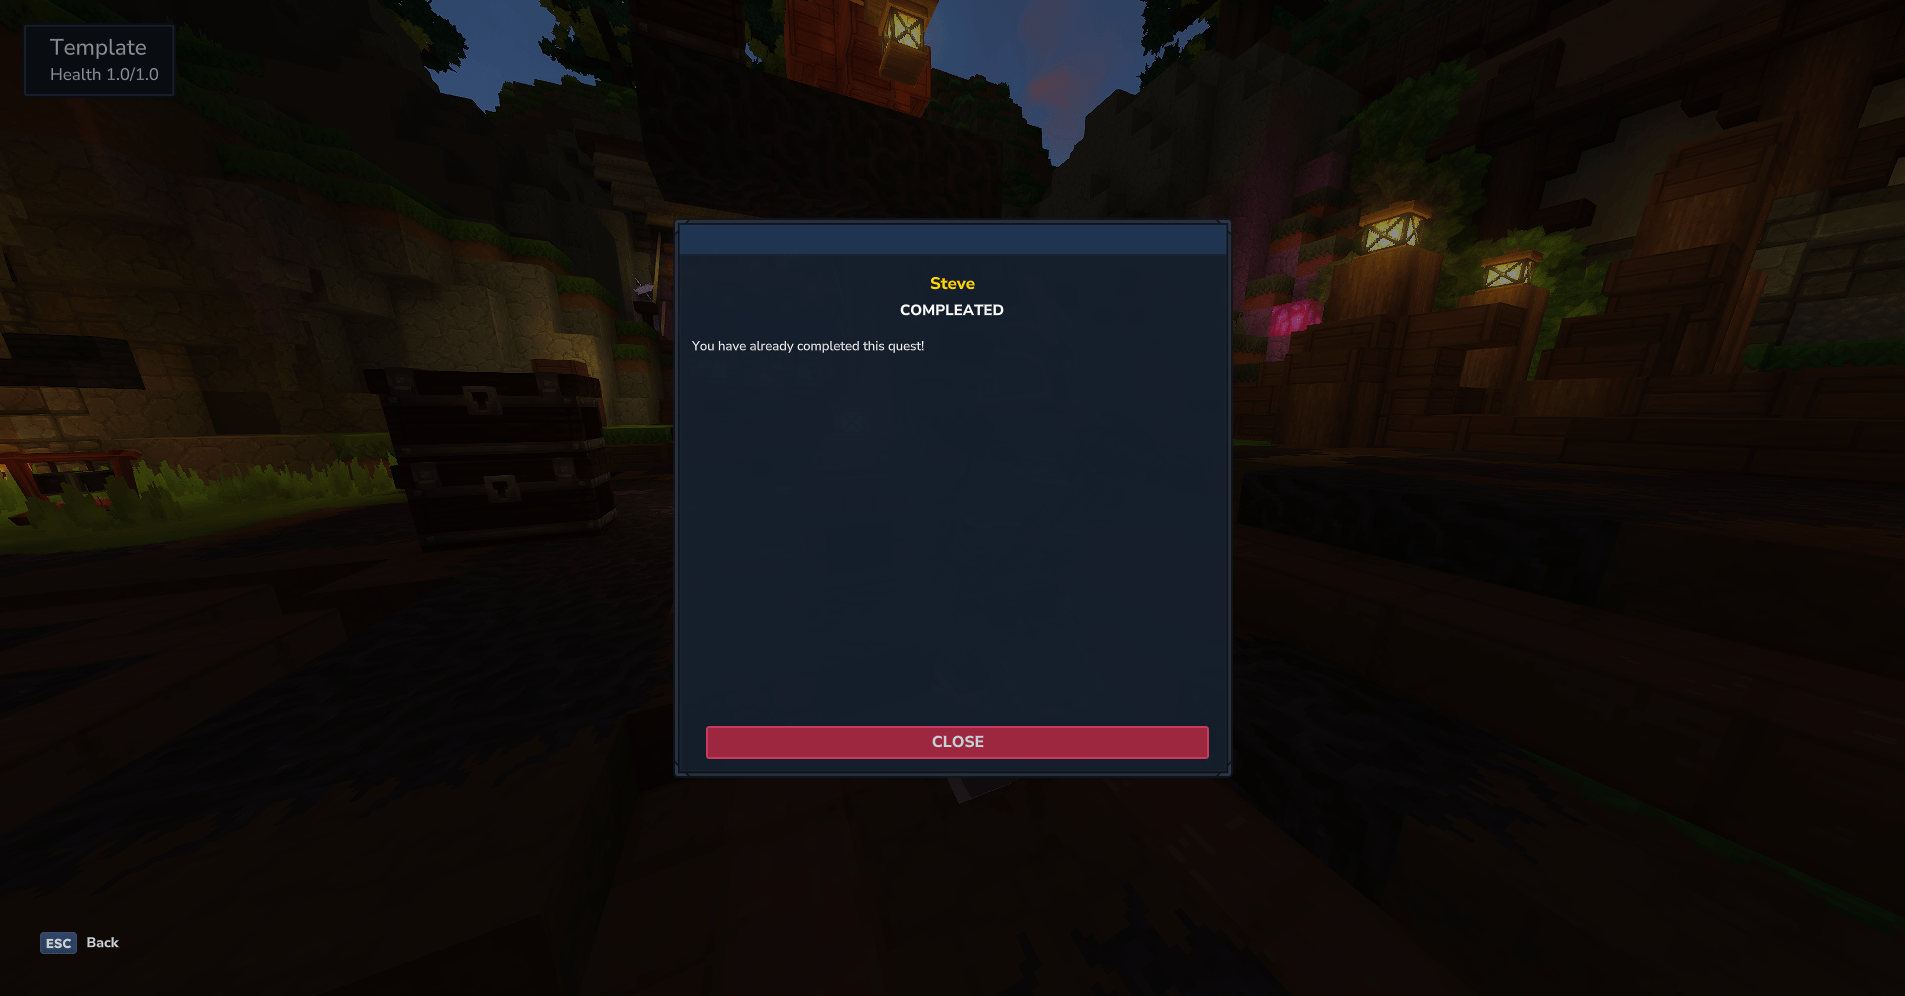
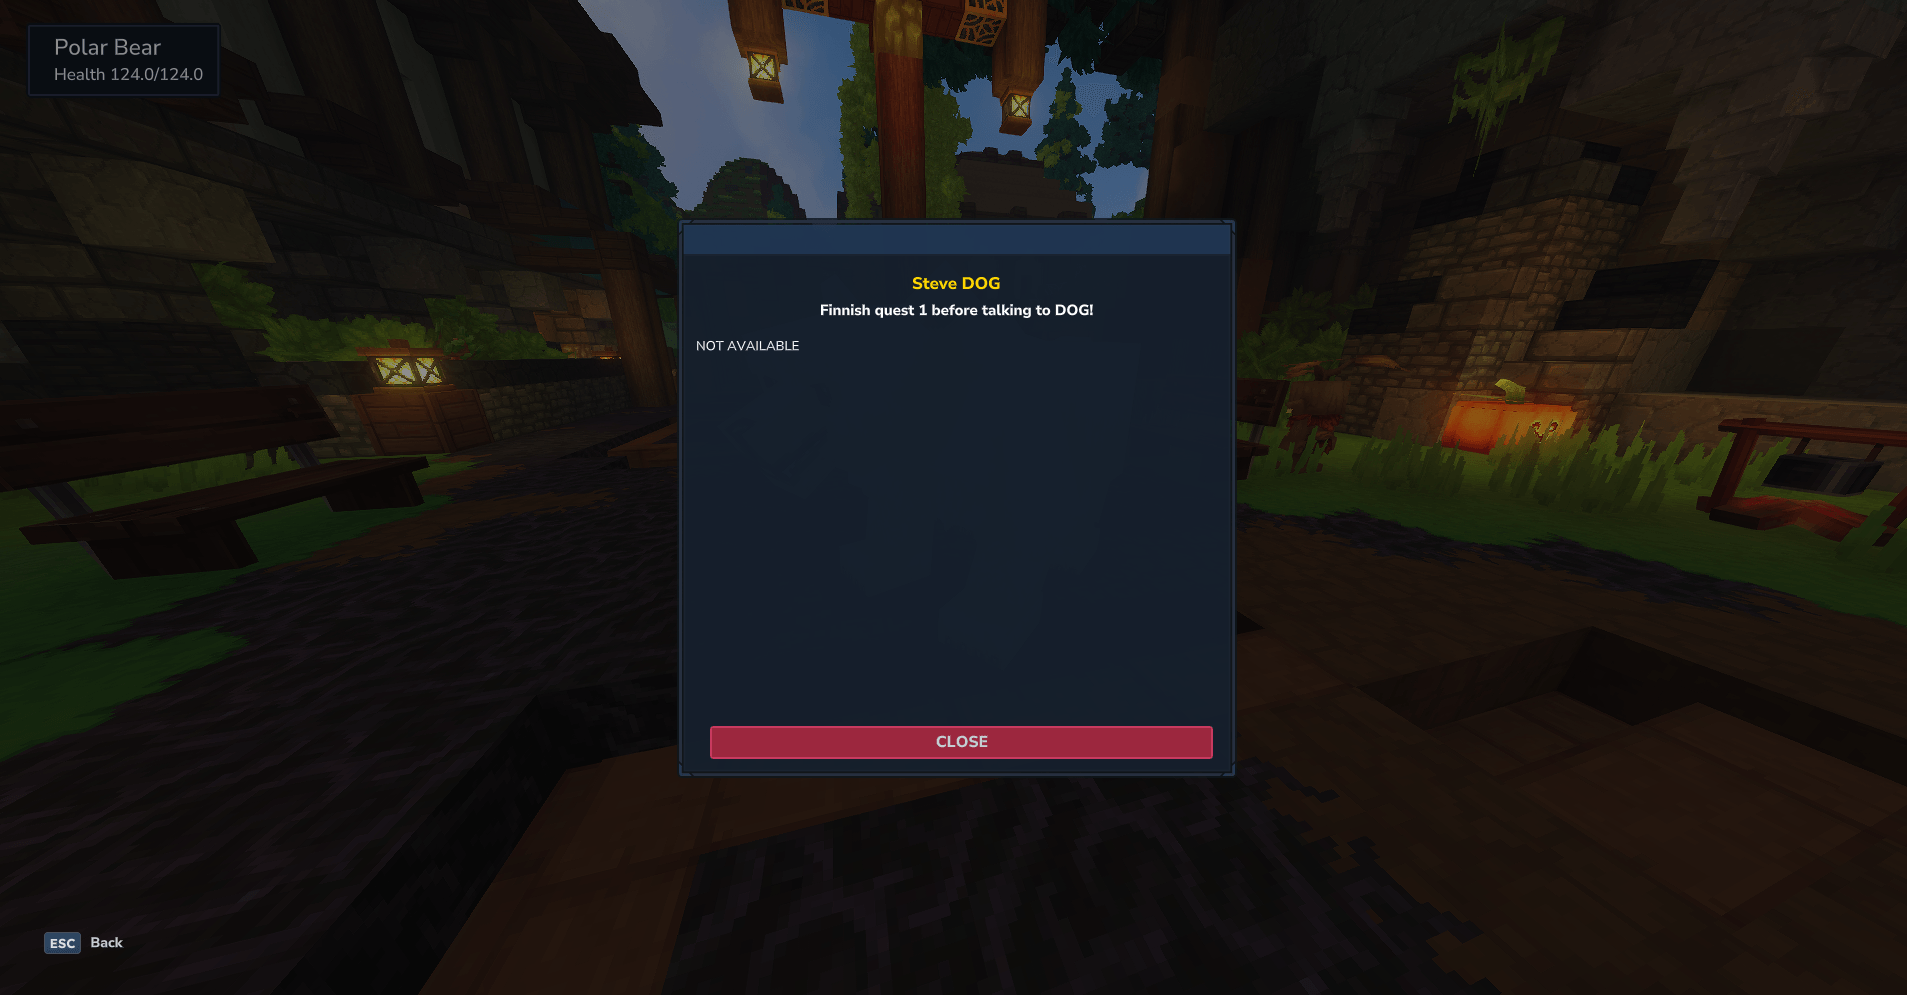
One powerful feature is the Last Button system, which allows any button to be marked as the final interaction. When a player clicks a Last Button, the dialog closes and they can no longer interact with that NPC. This is perfect for completing storylines or locking content after completion. When a player attempts to interact with an NPC after a Last Button has been clicked, they see a Finished Page with customizable messages.
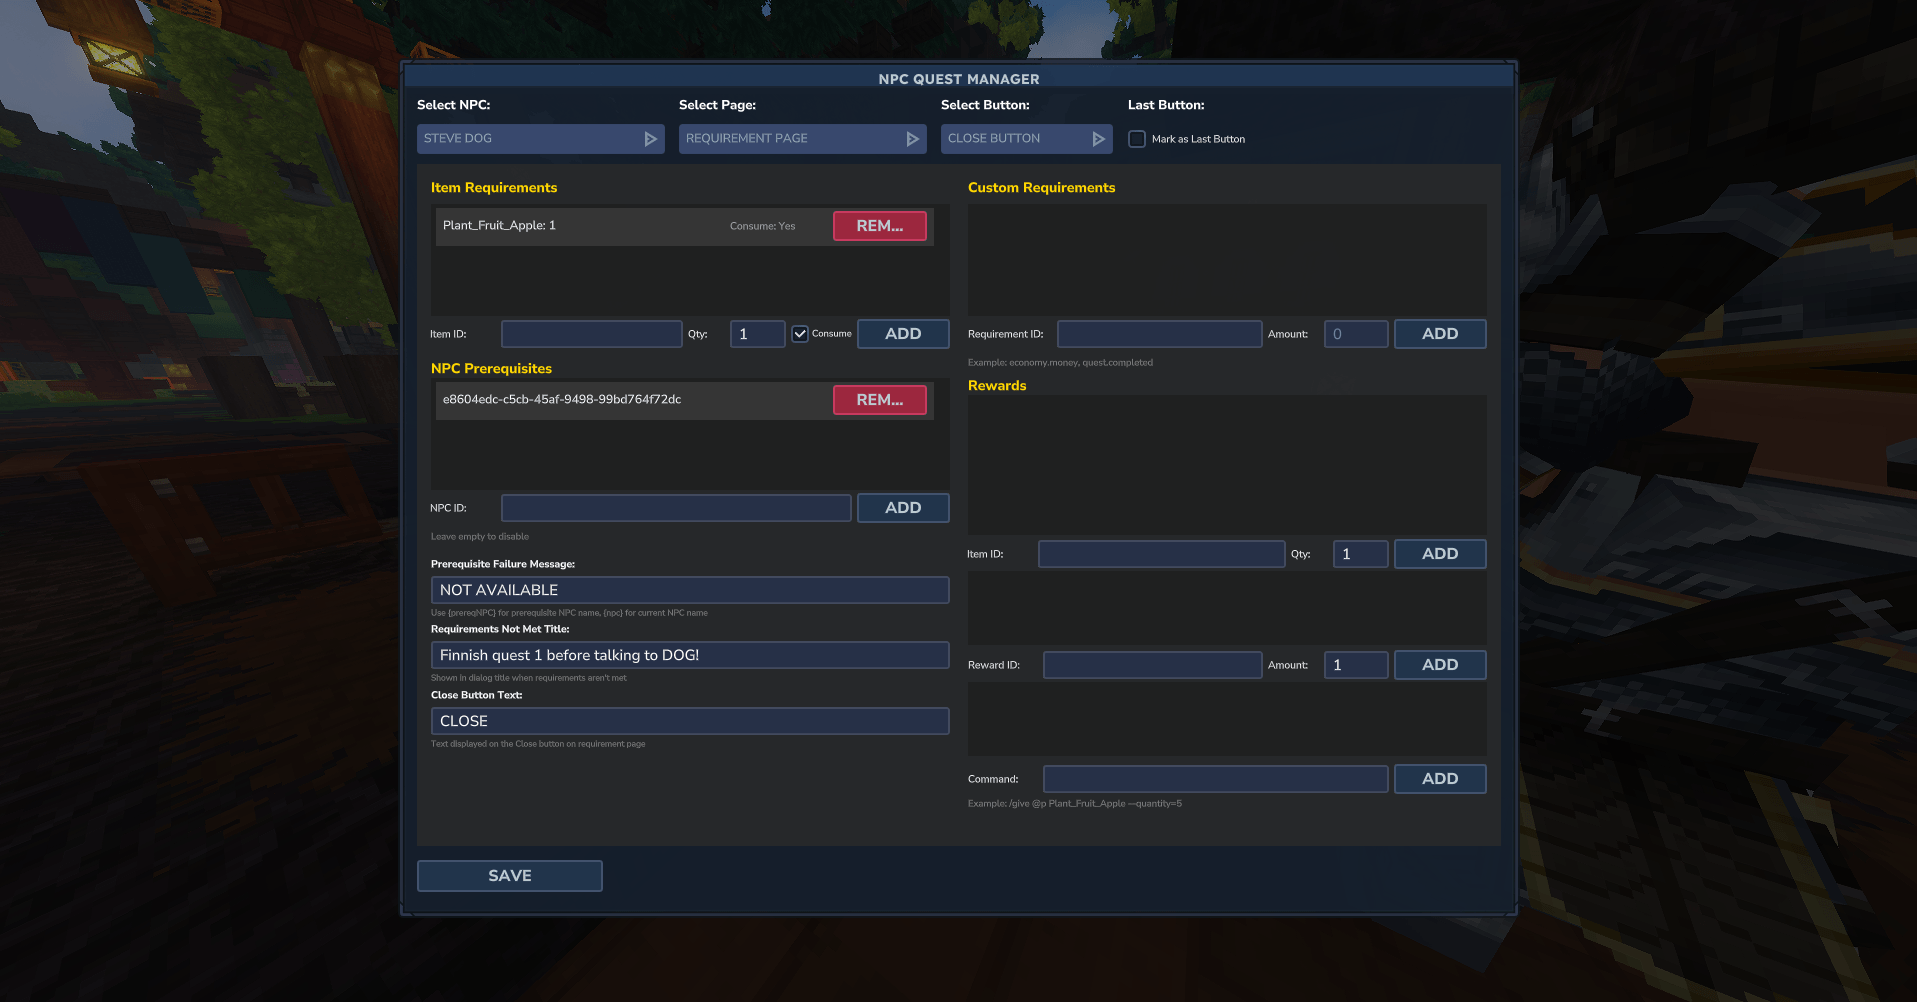
The addon includes a comprehensive admin UI accessible via the /npcquest command. This interface provides easy configuration of all quest-related settings without needing to edit JSON files manually. Administrators can select NPCs, dialog pages, and individual buttons to configure their requirements and rewards.
CONFIGURATION GUIDE:
INSTALLATION:
PREREQUISITE: NPC Dialog plugin must be installed and working before installing NPC Quests.
1. Install and configure the NPC Dialog plugin first 2. Place NPC Quests JAR file in your server's mods folder 3. Restart the server 4. The addon will automatically detect and integrate with NPC Dialog
ACCESSING THE ADMIN UI:
Use the command /npcquest or /npcquests to open the quest configuration interface. You must have the npcquests.admin permission to use this command.
BASIC SETUP:
1. Select an NPC from the dropdown at the top 2. Select a dialog page for that NPC 3. Select which button you want to configure (Next, Previous, Close, Custom Button 1, or Custom Button 2) 4. Configure requirements and rewards as needed 5. Click Save to save your changes
REQUIREMENT TYPES:
Item Requirements: Item requirements check if the player has specific items in their inventory before allowing them to click a button. You can add multiple item requirements to a single button.
To add an item requirement: - Enter the Item ID in the Item ID field (for example: Plant_Fruit_Apple) - Enter the quantity required in the Quantity field - Check the Consume checkbox if you want items to be removed when the requirement is met - Click Add Item Requirement
To remove an item requirement: - Find the requirement in the list - Click the Remove button next to it
Item IDs must match exactly with Hytale's item system. Common item IDs include Plant_Fruit_Apple, Ore_Iron, Weapon_Sword_Wooden, etc.
NPC Prerequisites: NPC prerequisites require players to interact with other NPCs before they can access certain buttons or NPCs. This creates quest chains where players must talk to NPCs in a specific order.
To add an NPC prerequisite: - Navigate to npcs.json file, search for the NPC and copy the NPC ID. - Click Add NPC Prerequisite
To remove an NPC prerequisite: - Find the prerequisite in the list - Click the Remove button next to it
NPC prerequisites are checked when: - A player tries to interact with an NPC (checks requirement page button prerequisites) - A player clicks a button that has NPC prerequisites configured
If prerequisites are not met, the player sees a customizable failure message and cannot proceed.
Custom Requirements: Custom requirements integrate with other plugins through the RequirementChecker API. This allows NPC Dialog to check conditions from other plugins like economy systems, level systems, or custom quest trackers.
To add a custom requirement: - Enter the Requirement ID (this is registered by another plugin via the API) - Enter the Amount required (use 0 for boolean checks) - Click Add Custom Requirement
To remove a custom requirement: - Find the requirement in the list - Click the Remove button next to it
The Requirement ID must be registered by another plugin using the NPC Dialog API. Contact the developer of the other plugin to find out what requirement IDs are available.
REWARD TYPES:
Item Rewards: Item rewards give players items when they click a button that has rewards configured. You can add multiple item rewards to a single button.
To add an item reward: - Enter the Item ID in the Item ID field - Enter the quantity to give in the Quantity field - Click Add Item Reward
To remove an item reward: - Find the reward in the list - Click the Remove button next to it
Items are given to the player's inventory. If the inventory is full, items may be dropped or lost depending on server settings.
Custom Rewards: Custom rewards integrate with other plugins through the RewardProvider API. This allows NPC Dialog to grant rewards from other plugins like economy systems, experience systems, or custom reward trackers.
To add a custom reward: - Enter the Reward ID (this is registered by another plugin via the API) - Enter the Amount to give - Click Add Custom Reward
To remove a custom reward: - Find the reward in the list - Click the Remove button next to it
The Reward ID must be registered by another plugin using the NPC Dialog API. Contact the developer of the other plugin to find out what reward IDs are available.
Console Commands: Console commands execute server commands when a button with rewards is clicked. Commands execute as console, meaning they have full permissions and can use admin commands.
To add a console command: - Enter the full command in the Command field (for example: give @p Plant_Fruit_Apple --quantity=5) - Click Add Console Command
To remove a console command: - Find the command in the list - Click the Remove button next to it
Commands support placeholders like @p for the player who triggered the button. All commands execute with console permissions.
REQUIREMENT PAGE CONFIGURATION:
The Requirement Page is a special dialog page that is shown when a player first interacts with an NPC but hasn't met the prerequisites to access the main dialog. You can configure this page by selecting "Requirement page" from the Page dropdown.
NPC Prerequisite Failure Message: This message is shown to players when they haven't talked to required prerequisite NPCs. You can use {PREREQNPC} placeholder for the prerequisite NPC name and {NPC} placeholder for the current NPC name.
Requirements Not Met Title: This title is shown in the dialog title bar when requirements are not met. Leave empty to use the page title.
Close Button Text: The text displayed on the close button when requirements are not met. Leave empty to use default text.
LAST BUTTON FEATURE:
The Last Button feature allows any button to be marked as the final interaction with an NPC. When a player clicks a Last Button:
1. The dialog closes immediately 2. The interaction is marked as finished 3. The player can no longer interact with that NPC
If a player attempts to interact with an NPC after clicking a Last Button, they will see the Finished Page instead of the normal dialog.
To enable Last Button: 1. Select the NPC, page, and button you want to make the last button 2. Check the "Mark as Last Button" checkbox 3. Configure the Finished Page settings (see below) 4. Click Save
FINISHED PAGE CONFIGURATION:
The Finished Page is shown when a player tries to interact with an NPC after a Last Button has been clicked. Configure this page in the admin UI when the Last Button checkbox is enabled.
Finished Page Title: The title shown in the dialog title bar when the finished page is displayed.
Finished Page Message: The main message shown to the player explaining that they have already completed this interaction.
Finished Close Button Text: The text displayed on the close button for the finished page.
DATA STORAGE:
All quest configuration data is stored in JSON files in the Hyronix_NPC Quests folder within your server's data directory. The interactionHistory.json file tracks which players have interacted with which NPCs, including which interactions are marked as finished.
The data folder structure: - Hyronix_NPC Quests/ - npcs/ (individual NPC JSON files) - interactionHistory.json (player interaction tracking)
INTERACTION TRACKING:
The plugin automatically tracks all player interactions with NPCs. This tracking is used to: - Check NPC prerequisites - Prevent repeated interactions when Last Button is enabled - Maintain quest progression state
Interaction history is stored per player and persists across server restarts. To reset a player's interaction history, you can manually edit or delete their entry in interactionHistory.json.
BUTTON CONFIGURATION:
You can configure requirements and rewards for the following buttons: - Next Button: The button that advances to the next dialog page - Previous Button: The button that goes back to the previous dialog page - Close Button: The button that closes the dialog - Custom Button 1: First customizable button (if enabled on the dialog page) - Custom Button 2: Second customizable button (if enabled on the dialog page)
Each button can have: - Multiple item requirements - Multiple NPC prerequisites - Multiple custom requirements - Multiple item rewards - Multiple custom rewards - Multiple console commands - Last Button status
BUTTON WORKFLOW:
When a player clicks a button, the following happens in order:
1. Requirements are checked: - Item requirements: Checks if player has required items - NPC prerequisites: Checks if player has talked to required NPCs - Custom requirements: Checks with registered requirement checkers
2. If any requirement fails: - A failure message is shown to the player - No rewards are given - The button action does not proceed
3. If all requirements pass: - Required items are consumed (if consume is enabled) - Rewards are given: - Item rewards are added to inventory - Custom rewards are processed by registered reward providers - Console commands are executed
4. If Last Button is enabled: - Dialog closes - Interaction is marked as finished - Player cannot interact with this NPC again
5. If Last Button is not enabled: - Normal button action proceeds (page change, dialog close, etc.)
QUEST SYSTEM USAGE GUIDE
This guide explains how to use the quest system with NPC Dialog, specifically the 'quest:' reward and requirement IDs.
--- QUICK START: HOW TO MAKE A QUEST --- Follow these 3 easy steps to make a basic quest (called 'quest_a'):
1. START BUTTON (Let them accept) - Reward ID: quest:start:quest_a - Requirement ID: quest:status:quest_a:AVAILABLE - Result: Button only shows if they don't have it. Clicking it starts the quest.
2. FINISH BUTTON (Let them complete) - Reward ID: quest:complete:quest_a - Requirement ID: quest:active:quest_a - Result: Button only shows while they have the quest. Clicking it finishes it.
3. NEXT BUTTON (Let them proceed) - Requirement ID: quest:completed:quest_a - Result: Player CANNOT click "Next" until they finish the quest.
--- REWARD IDs (Action to take) --- 1. quest:start:<quest_id> - Description: Starts the specified quest (sets status to ACTIVE). - Notes: Does nothing if the quest is already ACTIVE or COMPLETED.
2. quest:complete:<quest_id> - Description: Completes the specified quest (sets status to COMPLETED).
3. quest:set_status:<quest_id>:<status> - Statuses: LOCKED, AVAILABLE, ACTIVE, COMPLETED.
--- REQUIREMENT IDs (Check quest status) --- 1. quest:active:<quest_id> - Condition: Player must have the quest in ACTIVE status.
2. quest:completed:<quest_id> - Condition: Player must have the quest in COMPLETED status.
3. quest:status:<quest_id>:<status> - Condition: Player must have the specified status exactly.
--- EXAMPLE: 4-BUTTON SETUP (Lifecycle of 'quest_a') ---
This setup allows an NPC to handle the entire flow of a quest using 4 buttons.
1. CUSTOM BUTTON 1: "Accept Quest" - Requirement: quest:status:quest_a:AVAILABLE - Reward: quest:start:quest_a - Logic: Only button visible initially. Clicking it starts the quest and makes this button disappear.
2. CUSTOM BUTTON 2: "Complete Quest" - Requirement: quest:active:quest_a - Reward: quest:complete:quest_a - Logic: Only appears while you have the quest. On click, it finishes it. (You can add item requirements here too!)
3. NEXT BUTTON (Default Navigation) - Requirement: quest:completed:quest_a - Logic: This button is "greyed out" or hidden until you finish the quest. Allows moving to the next dialog page only after completion.
4. CLOSE BUTTON (Default Navigation) - Requirement: (None) - Logic: Always available so the player can leave the conversation.
--- TIPS --- - Multiple Requirements: You can combine quest requirements with items (e.g., must have 5 apples AND quest must be active). - Performance: Quests are processed locally on the player entity.
PERMISSIONS:
The only permission required is npcquests.admin for accessing the /npcquest command. All quest logic and requirements work automatically for all players once configured.
TIPS AND BEST PRACTICES:
1. Plan your quest chains before creating them. Draw out which NPCs need to be talked to in what order.
2. Use meaningful NPC names and dialog content to guide players through your quest chains naturally.
3. Test your quest chains thoroughly. Make sure prerequisites work correctly and rewards are given properly.
4. Use the Last Button feature sparingly. Only mark buttons as Last Buttons when you truly want to prevent further interaction.
5. Keep your Requirement IDs and Reward IDs documented if you're integrating with custom plugins. This makes configuration easier.
6. Use console commands for complex reward scenarios that item or custom rewards can't handle.
7. Always save your changes after configuring requirements or rewards. Unsaved changes will be lost.
8. The admin UI shows all configured requirements and rewards. Use this to verify your configuration before testing in-game.
TROUBLESHOOTING:
Issue: Requirements not being checked Solution: Make sure you selected the correct NPC, page, and button before adding requirements. Ensure you clicked Save after making changes.
Issue: Rewards not being given Solution: Verify that requirements are being met. Rewards only trigger when all requirements pass. Check that item IDs are correct and custom reward IDs are registered.
Issue: NPC prerequisites not working Solution: Make sure the prerequisite NPC is configured in NPC Dialog. The prerequisite NPC must exist and be accessible. Verify interaction history is being tracked correctly.
Issue: Last Button not preventing interaction Solution: Make sure you saved the Last Button configuration. Check that the interactionHistory.json file is being written to correctly.
Issue: Cannot access admin UI Solution: Verify you have the npcquests.admin permission. Check that the NPC Dialog plugin is installed and working. Ensure the NPC Quests addon loaded without errors.
Issue: Custom requirements or rewards not working Solution: Verify that the other plugin has registered its RequirementChecker or RewardProvider with NPC Dialog. Check that requirement IDs and reward IDs match exactly between the plugins.
ADVANCED FEATURES:
The NPC Quests addon includes support for the RequirementChecker and RewardProvider APIs. Other plugins can register custom requirement checkers and reward providers, allowing for deep integration between NPC Dialog and other server systems.
NPC DIALOG API DOCUMENTATION FOR DEVELOPERS:
GETTING STARTED:
Get the plugin instance: NPCDialogPlugin plugin = NPCDialogPlugin.getInstance(); if (plugin == null) { return; // NPC Dialog not installed }
REQUIREMENT CHECKER API:
Register custom requirements that players must meet to proceed in NPC dialogs.
Interface: com.hytale.npcdialog.api.RequirementChecker
Methods: boolean checkRequirement(Player player, String requirementId) Returns true if player meets the requirement.
String getErrorMessage(String requirementId) Optional. Returns custom error message or null for default.
Registration: plugin.registerRequirementChecker("economy.money", new RequirementChecker() { @Override public boolean checkRequirement(Player player, String requirementId) { // Check if player has enough money return hasEnoughMoney(player); } @Override public String getErrorMessage(String requirementId) { return "You do not have enough money."; } });
REWARD PROVIDER API:
Register custom rewards that can be given to players through NPC interactions.
Interface: com.hytale.npcdialog.api.RewardProvider
Methods: boolean giveReward(Player player, String rewardId, double amount) Returns true if reward was successfully given.
String getRewardMessage(String rewardId, double amount) Returns message to display when reward is given.
Registration: plugin.registerRewardProvider("economy.money", new RewardProvider() { @Override public boolean giveReward(Player player, String rewardId, double amount) { // Give money to player return addMoney(player, amount); } @Override public String getRewardMessage(String rewardId, double amount) { return "You received " + amount + " coins!"; } });
USAGE:
Once registered, administrators can use your requirement IDs and reward IDs in the NPC Quests admin UI. Use descriptive, namespaced IDs like "yourplugin.feature.requirement".
CLEANUP:
Unregister during plugin shutdown: plugin.unregisterRequirementChecker("economy.money"); plugin.unregisterRewardProvider("economy.money");
Distribution Notice: This mod may not be redistributed or bundled with third-party setups without clear and visible credit to Hyronix Studios and the mod name. Otherwise, redistribution is not permitted.
Categories
Screenshots

Need a Server?
Run NPC Quests on a dedicated Hytale server with easy mod management.
Get Hytale HostingFrequently Asked Questions
What is NPC Quests?
Create deep NPC-driven quests with branching stories and rewards. NPC Quests is an addon for NPC Dialog that adds a full quest system with prerequisites, item requirements, custom plugin checks, rewards, interaction tracking, and complex quest chains.
How do I download NPC Quests?
You can download NPC Quests for free from CurseForge. Click the "Download on CurseForge" button on this page to go directly to the download page.
Who created NPC Quests?
NPC Quests was created by Hyronix. The mod has been downloaded 2.9K times.
Is NPC Quests compatible with Hytale servers?
NPC Quests is designed for Hytale and can be used on both single-player and multiplayer servers. Check the mod page on CurseForge for specific compatibility information.
How do I install NPC Quests?
To install NPC Quests: 1) Download the mod from CurseForge, 2) Place the file in your Hytale mods folder, 3) Restart the game. The mod should load automatically.
Related Creatures Mods
View all mods
Aures - Livestock Skins
BlackAuresArt
Adds a variety of colors and random variations for rabbits, mouflons, pigs, sheeps, rams, goats and other!
Aures - Horse Skins
BlackAuresArt
Adds a random variations for horses! Also slightly changes the model and animations of horses.

The Amazing Spider-Man Skin Pack!
stonedturtle
This is one of the only Skin mods I've seen! This replaces the player model in-game with a Spider-Man one! Comes with a Brighter Red/Blue, Darker Red/Blue, Symbiote Versions, Miles, 2099, and Scarlet Spidey (Ben Riely)
![[NoCube's] Undead Warriors](https://media.forgecdn.net/avatars/thumbnails/1602/742/256/256/639035338178853736.png)
[NoCube's] Undead Warriors
NoCube
Adds enemy skeletons with random equipment.
Skeleton Banging Shield
Jen3713_
Makes some skeletons bang their weapon while yelling "RAAAAH"

HyTame - Animal Breeding
LaitK
Animal breeding and baby growth for Hytale to expand your farm